The Latte is one of the most popular coffee drinks there is and knowing how to make a great Latte is something everyone should have in their coffee making arsenal. This guide will teach you how to make the perfect Latte with and without a coffee machine, as well as answer any other questions you might have about the milky coffee.
So sit back, pour yourself a coffee and let’s find out how to make the perfect Caffè Latte!
Skip to a section:
In its simplest form a Latte (also known as a Caffè Latte) is just a coffee with milk.
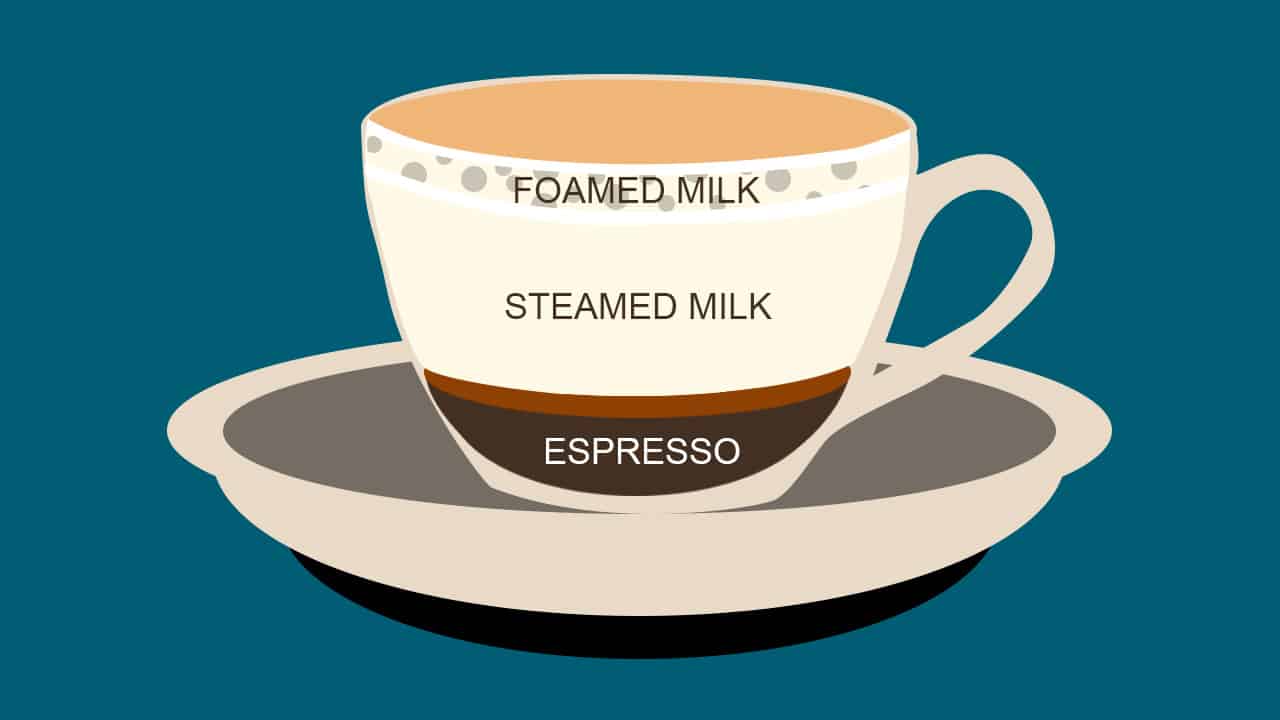
There isn’t really an official size but are commonly served in an 8 ounce (240ml) cup and are made up of approximately 1/5th Espresso (usually 1 shot) and 4/5ths steamed milk, with a small amount of (approx. 1 – 2cm) foamed milk on top.

Share this Image On Your Site
The 1:5 ratio of Espresso to milk makes the Latte, the milkiest out of the Espresso based coffees and therefore the weakest in Espresso taste – making this a great entry point into the world of coffee for a lot of people.
The amount of milk gives the Latte a sweetness and a luxurious, coating quality to its mouth-feel.
The origins of the Latte aren’t certain, but coffee with milk is thought to have originated in Italy. Though, it could’ve been any number of European countries, as places like Italy, Spain, France, Germany, and Austria, have been combining coffee and milk since at least the 17th century.
The Latte as we know it is said to be an American invention, obviously working off the original European recipe. The yanks are said to have standardised and popularised it, but these claims aren’t seen as gospel.
Latte art is the artwork that is produced on the surface of Lattes (and any other coffee drink with milk foam such as the Cappuccino) that is achieved by a skilful hand when combining the milk and the Espresso.
Common Latte art designs are hearts and rosettes, but really the only limit on what you can create is your imagination (and skill of course).
We will delve deeper into Latte art in a future article.
Firstly, fill a coffee cup with hot water and place it to one side – by keeping the cup at a high temperature, less heat will be required in the milk later on, improving its flavour.
The Espresso Shot
Clean the portafilter than wipe it dry with a tea towel.
Fine grind a small portion of coffee and throw it away (this ensures that only fresh beans will be used in the Latte), then grind a timed dosage.
Weigh the grounds, I’m using 18g but this depends on the coffee, your taste, etc. but for this Espresso I’m using 18g.
Level out the coffee by moving it around the basket with the side of your finger or by tapping the side of the basket to agitate it into position.
Use a tamper to compact the grounds by pressing the tamper directly down, on top of the coffee grounds, ensuring an even spread. An even spread will guarantee that the water passing through the grounds will all travel at the same speed regardless of where it penetrates.
30 pounds of vertical pressure is optimum for tamping, measuring this can be easily achieved with a calibrated (clicker) tamper.
Tampers we love!
Flush a small amount of water through the group head, empty the previously filled cup and place it in position.
Now it’s time to extract the coffee using an extraction time of approximately 30 seconds, looking to produce 36g of liquid Espresso (2:1 ratio).
For more information on making the perfect Espresso checkout our comprehensive guide!
The Milk
Ideally whole milk is used for its creaminess, but any milk alternatives can be used.
Pour the milk into a steaming pitcher until you hit about the halfway point.
A good tip is to never fill the pitcher less than 40% or more than 60% of its capacity, the former so there is enough milk to make the drink and the latter so there is enough room for the milk foam.
Purge a little bit out of the steam wand as the initial steam that comes out is overly watery.
Place the steam wand into the pitcher a little off centre, this will allow the milk to spin once the steam begins to come out.
First texturise the milk; this is done by sitting the steam wand just below the milk’s surface for a few seconds. The steam wand is then plunged deeper, allowing the milk to heat up further without affecting the texture created in the previous step.
As soon as the steaming pitcher is too hot to hold, it’s time to turn the steam off.
Then clean and purge the steam wand.
Leave the milk pitcher on a flat surface for a few seconds then tap the pitcher on the table a couple of times and give it a swirl, this is a process called polishing and will ensure a smoother, shinier texture on the milk.
Combining The Ingredients
Pour the milk into the Espresso keeping the pitcher high so there is a long pour. When nearing the end bring the pitcher down so it is touching the cup and increase the speed of the pour, this will produce a small amount of foam on top.
Espresso machines we love!
This might sound unbelievable but not everyone has thousands to spend on a professional Espresso machine at home.
Crazy, I know.
Because of this we’ve outlined a number of ways to make a Latte without an Espresso machine.
We have ranked them from most to least ideal, but it will also depend on what equipment is available to you.
So in the following sections you’ll find out:
If you already know which home technique you want to use, feel free to click the title and skip straight to that section.
But before you move on there is a couple things you should know:
It is actually impossible to make Espresso without a machine as it has a very specific definition. What we will be making however, is a strong Espresso-like coffee.
As the process for preparing the milk will be the same for whichever technique you use, I have outlined this in its own section below, which you can skip straight to by clicking HERE.
Finally, before we begin I’ll quickly talk about bean choice and grind size as once again, this will be the same for every technique.
Coffee bean selection
Espresso is characterised by it’s rich, strong flavour so your average light or medium roasted beans just won’t cut the mustard when using these brewing techniques. This is why we recommend you use a dark roasted bean.
The grind
Espresso has a very fine grind and to achieve the best tasting coffee we recommend grinding fresh beans yourself. A Burr grinder will be your best bet here as it provides the best way to get a uniform grind.
If you don’t have a Burr grinding, don’t worry! Any grinder is okay or just purchase a bag of finely ground coffee.
Coffee grinders we love!
The perfect Moka Pot Espresso recipe
This is our most ideal method and is the closest you can get to making Espresso at home without a fancy machine.
The brew
Prepare your hot water.
Once the water has boiled fill the water reservoir on the Moka pot.
Add 20 – 22 grams (0.71 – 0.78 ounces) of your ground coffee to the Moka Pot’s filter basket.
Add the spouted top.
Place the Moka Pot onto a stove at a medium heat (no hotter).
As it heats the pressure will build, pushing coffee from the lower chamber into the upper chamber.
When you hear the first bubble, get that pot off the heat and pour immediately.
Moka Pots we love!
The perfect AeroPress Espresso recipe
The brew
We are not going to operate the AeroPress as it was intended so please be safe as you are dealing with hot water and could easily hurt yourself.
So firstly flip your AeroPress upside down.
Push the plunger into the main chamber of the AeroPress quite a bit so a seal is produced, making sure to leave enough room in the top to add your coffee and water.
Rinse the filter and put it to one side.
Add 18 grams (0.6 ounces) of your coffee grounds into the top followed by 90 grams (3.2 ounces) of hot water.
Stir with a small spoon ensuring that every one of your tiny grounds are completely coated by the water.
Place the filter on top.
Let sit for 90 seconds.
After 90 seconds invert the AeroPress and place it on your cup.
Press down gently and evenly until you hit the bottom.
And there you have it!
The perfect French Press (Cafetière) Espresso recipe
This is our least preferred option as far as taste and consistency goes but it is also the most accessible/inexpensive option.
The brew
Prepare your hot water.
Once the water has boiled leave it to sit for 20 seconds or so.
While you wait add 2 tablespoons of your finely ground coffee into your cafetiere.
Add a small amount of hot water to the cafetiere (just enough to cover the grounds) and let sit for about 30 seconds. This is a process called ‘blooming’ allowing the beans to begin releasing their oils.
Next add the rest of the water slowly (enough to make one cup).
Do not stir.
Place the lid (with the plunger completely retracted) on top of the cafetiere and let sit for 4 minutes.
Begin pressing the plunger down slowly, with even pressure. Just the natural weight of your hand should be enough.
When the plunger reaches half way, retract it back to the top and begin again, this time allowing the plunger to go all the way to the bottom.
Pour your Espresso(ish) drink into your mug.
Cafetières we love!
- Heat milk over the stove and use a whisk.
- Purchase a frothing wand.
- Heat milk, pour it in a suitable container than shake.
- Purchase a milk frother.
Now that you have your foamed milk, pour it into the Espresso keeping the pitcher high so there is a long pour. When nearing the end bring the pitcher down so it is touching the cup and increase the speed of the pour, this will produce a small amount of foam on top.
That’s it!
We hope our guide answered any Latte related questions you may have had. Now go and make some coffee!
As always if you have any questions or feel like we have missed anything please send your questions/suggestions to [email protected]
Small Notice
If you click on any of our Amazon links and make a purchase, we earn a commission at no additional cost to you!


